Showing posts with label USEFUL INFORMATION. Show all posts

Sunday, September 6, 2009

Tips for buying a beautiful home

Planning to buy a home? It’s a great idea and here are some tips to help you choose wisely. Shortlist properties based on these concepts and you should find the entire process less confusing than you think it is.

1 Aspirations, lifestyle

While you may want the moon, think clearly and decide what kind of lifestyle you and your family would be comfortable with. Villas, apartments, individual home, an executive floor, all entail a particular type of lifestyle. Deciding between living in the inner city and a suburb is also a lifestyle decision. If you like a quiet laid back life, choose a suburb. If you like being in the hub of things and having everything nearby, but are willing to settle for less space and more noise, the city will work fine for you. Think of scenarios about 10 years into the future and identify a place that will suit your needs till then.

2 What’s the size of your pocket?
Figure out your loan eligibility from a housing loan company or bank. Look at your resources and decide how much money you can pay up as a lump sum. That will help you do a back calculation and decide what budget you should have while looking for a home.

3 Study the market carefully

It is important to do your own research on the property market while buying a home. A lot of people take property decisions based on the advice of someone they know. While trust is a good thing, this can also get you in trouble. Start looking at property supplements and trade magazines. Visits brokers, look at websites, visit exhibitions, then shortlist properties based on your requirement and budget.

4 Location is important

Find places near to work, to the kids’ school, to a shopping centre and other conveniences. Also figure out how good the access is, what the neighbouring areas are, the quality of infrastructure. Find out what’s going to come up in an area in the future, to whatever extent has already been planned. A visit to local brokers and a contact with the planning department of the local area might yield some results.

5 Study the layout as well

Study the layout of the apartment well. Making changes to an apartment is possible, but it is time consuming and costly. First of all, see if there are enough rooms for your family. The same area can accommodate two large bedrooms or three smaller ones. What you need is dependent on the size of your family. Check on the size of the living, dining and kitchen. The sizes of the bedrooms should accommodate double beds easily.

Check if there are provisions for electrical equipments. Storage is important. The flat should maximise the use of space.
The rules are many, but whatever your taste, you need to ensure convenience and safety. For a child or elderly person, this could make the difference between comfort and fear.
Use the sample flat to understand the layout, but sit down with an architect or interior designer to see what possibilities it has for remodeling in the future.

6 Finishes and amenities

With apartment developers going all out to woo customers, you have a lot to choose from. Don’t get taken in by all the jazz though. Figure out what amenities you would really use and whether they are there or not. Security mechanisms, power back-up, open areas and basic sports facilities would be essentials, but beyond that it’s up to you.

Interior finishes is also a subjective area, but you need to remember that the sample flat is not necessarily what your apartment will look like. While Italian marble may sound very good in a specification list, you may discover that it is too slippery and smooth for your old father to walk on. Again, talk to a professional to understand what the finishes in the specification list mean and look like.

7 Background check

Once you have zeroed down on a development, it is important to look at the track record of the builder. Find out about the builder’s last few projects. Visit them and study the finishes, speak to residents about the quality of construction, delivery time and maintenance arrangements. CREDAI is working at putting in place a developer rating system that evaluates a range of factors like on-time delivery, construction quality, track record, etc. This will in all probability be done by CRISIL.

8 Go through the right sources

Don’t buy something only because you’re getting a cheaper deal from someone. Beware of inexperienced or crooked brokers. Always go through a reliable source. If possible, strike a direct deal with the builder.

9 Sort out the legalities

Take time to study the fine print lest there are loopholes later. Make sure the property is registered and apartments will be registered on completion.
Many developers, like CREDAI members follow a code of conduct that insists transparency and ensures that the builder honours the agreement that is signed between the buyer and the builder. The Code also insists that the developer clearly defines the terms in the agreement.

10 Be a proud owner

Once the property is in your name, you need to ensure that you pay your loan installments in time. Once you occupy the apartment, be pro-active and maintain it with utmost care.


Tips for selling a house for more money

1. Disassociate Yourself With Your Home.
• Say to yourself, "This is not my home; it is a house -- a product to be sold much like a box of cereal on the grocery store shelf.
• Make the mental decision to "let go" of your emotions and focus on the fact that soon this house will no longer be yours.
• Picture yourself handing over the keys and envelopes containing appliance warranties to the new owners!
• Say goodbye to every room.
• Don't look backwards -- look toward the future.
2. De-Personalize.
Pack up those personal photographs and family heirlooms. Buyers can't see past personal artifacts, and you don't want them to be distracted. You want buyers to imagine their own photos on the walls, and they can't do that if yours are there! You don't want to make any buyer ask, "I wonder what kind of people live in this home?" You want buyers to say, "I can see myself living here."
3. De-Clutter!
People collect an amazing quantity of junk. Consider this: if you haven't used it in over a year, you probably don't need it.
• If you don't need it, why not donate it or throw it away?
• Remove all books from bookcases.
• Pack up those knickknacks.
• Clean off everything on kitchen counters.
• Put essential items used daily in a small box that can be stored in a closet when not in use.
• Think of this process as a head-start on the packing you will eventually need to do anyway.
4. Rearrange Bedroom Closets and Kitchen Cabinets.
Buyers love to snoop and will open closet and cabinet doors. Think of the message it sends if items fall out! Now imagine what a buyer believes about you if she sees everything organized. It says you probably take good care of the rest of the house as well. This means:
• Alphabetize spice jars.
• Neatly stack dishes.
• Turn coffee cup handles facing the same way.
• Hang shirts together, buttoned and facing the same direction.
• Line up shoes.
5. Rent a Storage Unit.
Almost every home shows better with less furniture. Remove pieces of furniture that block or hamper paths and walkways and put them in storage. Since your bookcases are now empty, store them. Remove extra leaves from your dining room table to make the room appear larger. Leave just enough furniture in each room to showcase the room's purpose and plenty of room to move around. You don't want buyers scratching their heads and saying, "What is this room used for?"
6. Remove/Replace Favorite Items.
If you want to take window coverings, built-in appliances or fixtures with you, remove them now. If the chandelier in the dining room once belonged to your great grandmother, take it down. If a buyer never sees it, she won't want it. Once you tell a buyer she can't have an item, she will covet it, and it could blow your deal. Pack those items and replace them, if necessary.
7. Make Minor Repairs.
• Replace cracked floor or counter tiles.
• Patch holes in walls.
• Fix leaky faucets.
• Fix doors that don't close properly and kitchen drawers that jam.
• Consider painting your walls neutral colors, especially if you have grown accustomed to purple or pink walls.
(Don't give buyers any reason to remember your home as "the house with the orange bathroom.")
• Replace burned-out light bulbs.
• If you've considered replacing a worn bedspread, do so now!
8. Make the House Sparkle!
• Wash windows inside and out.
• Rent a pressure washer and spray down sidewalks and exterior.
• Clean out cobwebs.
• Re-caulk tubs, showers and sinks.
• Polish chrome faucets and mirrors.
• Clean out the refrigerator.
• Vacuum daily.
• Wax floors.
• Dust furniture, ceiling fan blades and light fixtures.
• Bleach dingy grout.
• Replace worn rugs.
• Hang up fresh towels.
• Bathroom towels look great fastened with ribbon and bows.
• Clean and air out any musty smelling areas. Odors are a no-no.
9. Scrutinize.
• Go outside and open your front door. Stand there. Do you want to go inside? Does the house welcome you?
• Linger in the doorway of every single room and imagine how your house will look to a buyer.
• Examine carefully how furniture is arranged and move pieces around until it makes sense.
• Make sure window coverings hang level.
• Tune in to the room's statement and its emotional pull. Does it have impact and pizzazz?
• Does it look like nobody lives in this house? You're almost finished.
10. Check Curb Appeal.
If a buyer won't get out of her agent's car because she doesn't like the exterior of your home, you'll never get her inside.
• Keep the sidewalks cleared.
• Mow the lawn.
• Paint faded window trim.
• Plant yellow flowers or group flower pots together. Yellow evokes a buying emotion. Marigolds are inexpensive.
• Trim your bushes.
• Make sure visitors can clearly read your house number.

vastu for peaceful home


Home Vaastu
1. Pooja Room

We have to pay attention towards following points when we consider about interior arrangement of temple in house.

• Appropriate Location of temple in a house
• Placement & direction of statue & picture's of god
• Sitting Direction of native
• Placement of earthen lamp
• Position of altar (havan kund)
• Prohibited raw material to use in construction in temple
• Prohibited things inside the temple
• Direction of door
• Prohibited location & rooms near to temple
• Numbers & direction of windows
• Appropriate position & direction of shelf.


2. Dining Room

We have to pay attention towards following points when we consider about interior arrangement of dinning room in house.

• Appropriate Location of dinning room
• Direction of door
• Direction of windows
• Size & shape of dinning table
• Placement & direction of dinning table
• Chair of senior position
• Prohibited direction to face at the time of taking food
• Placement of shelf


3. Bed Room

We have to pay attention towards following points when we consider about interior arrangement of bedroom in house.

• Appropriate Location of bedroom in house
• Direction of door
• Placement & direction of bed
• Placement & direction of dressing table
• Placement & direction of study table, almirah
• Placement & direction of safe
• Placement of electronic items
• Placement & direction of T.V, cooler, A.C


4. Study Room

We have to pay attention towards following points when we consider about interior arrangement study room in house.

• Appropriate Location of study room
• Direction of door
• direction of windows
• Placement & direction of study table
• Direction to face at the time of study
• Placement of shelf
• Direction of god's picture in study room


5. Kitchen

We have to pay attention towards following points when we consider about interior arrangement of kitchen in house.

• Appropriate Location of kitchen in a house
• Direction of door
• Position of window
• Position of slab, basin, tap
• Placement & direction of water related stuff
• Placement & direction of heater, gas, stove, oven
• Placement & direction of electric equipment, fridge, mixer, toaster, floor grinder
• Position of shelf
• Prohibited location & rooms near to kitchen


6. Bathroom

We have to pay attention towards following points when we consider about interior arrangement of bathroom in house.

• Appropriate Location of bathroom in a house
• Direction of door
• Direction of slope
• Position of windows
• Placement of water related stuff
• Placement of bathtub, tap, basin & heater
• Placement & direction of toilet pot
• prohibited raw material used in bathroom
• direction of changing clothes


7. Toilet

We have to pay attention towards following points when we consider about interior arrangement toilet in house.

• Appropriate Location of a toilet
• Direction of door
• Position of window
• Placement & direction of toilet of pot
• Placement water mug & tap
• Location of septic tank
• Prohibited raw material inside the toilet
• Placement & direction of basin.


8. Drawing Room

We have to pay attention towards following points when we consider about interior arrangement drawing room in house.

• Appropriate Location of drawing room
• Direction of door
• Placement & direction of furniture like sofa set, dinning table etc.
• Placement & direction for antic items
• Placement & direction of electronic items like TV, stereo, cooler.
• Placement & direction of shelf & showcase
• Placement & direction of statue, scenery, pictures/photo, clock,
• Placement of water related stuff, water fountain, and aquarium


9. Medicine Room

We have to pay attention towards following points when we consider about interior arrangement locker room or which place should be use for medicine room purpose in house.

• Location of room
• Direction of door
• Position of window
• Placement of medicine in the room
• Placement of bed in the room


10. Store Room

We have to pay attention towards following points when we consider about interior arrangement store room in house.

• Appropriate Location of room
• Direction of door
• Position of window
• Place and direction of heavy & light things inside the room


11. Locker Room

We have to pay attention towards following points when we consider about interior arrangement locker room or which place should be use for locker room purpose in house.

• Appropriate Location of locker room ( place for locker room purpose)
• Direction of door
• position of window
• Placement & direction of almirah
• Prohibit thing to keep inside the safe / almirah
• place to keep the precious thing inside the safe

PROCESS OF MAKING A DVD

Make a Video DVD
If you've ever wanted to make a DVD with your own menus, then we walk through the simple steps to authoring your first DVD. Using free software and tools, anyone can now make their own DVDs with just a DVD writer (obviously), some blank DVDs and the video clips you want to use.

Getting Started
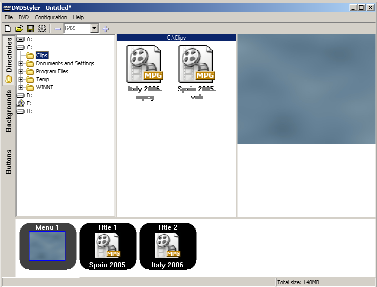
The software we are going to use to create the DVD menus and structure is DVDStyler which provides a nice unified frontend to an assortment of tools (dvdauthor, mkisofs etc), so you can simply create your DVD without needing to understand each step of the process (creating menus, iso images etc). So grab a copy of the latest version of the software, and install it.
We are going to walk through building a simple menu for a DVD consisting of just two video clips, so you can see how to add as many clips as you need. Building more complicated menus, dealing with subtitles, aspect ratios etc is beyond the scope of this article (though we may cover it in a later article).


Building the Menu
Start up the DVDStyler application, and choose your language from the first popup. The main screen should look something like this (with the backgrounds tab on the left hand edge selected)


Now we are ready to start adding text to the menu. Right click on the background in the right hand pane, and select add then text.


Drag the text around the screen to position it where you want, then right click on the text and select properties to change the text show


Next, click on the buttons tab on the left hand edge of the window, and drag the button from the left pane to the right pane. Drag the button once for each menu item you want.


Right click and select properties of each of the buttons you have added to the right pane, and change the text of each button to something more meaningful. Also set the action of each button to point to the correct video click, as labeled in the bottom timeline pane.


Now the menus are setup how you want, you can create the disk.

Writing to disc
To create the DVD, simply select file then Burn DVD... from the main menu. If your DVD drive isn't recognised by DVDStyler then don't worry, just create an ISO image instead, and use your normal DVD software (such as Nero Express) to burn the image to the DVD.


It usually takes a while for DVDStyler to process and check all of your video clips first before it starts creating the DVD image to burn.

If your DVD is going to be less than 1024MB in size, then it's probably best to create a VideoCD instead, and there appear to be some compatibility issues with small Video DVDs, as not all players seem to want to play them, and Nero Express may want to write them to a CD instead of a DVD.

Once the DVD is burned, you should be able to put it in your normal DVD player and enjoy your hardwork on your TV. The DVDStyler website has a more detailed manual for creating more complex DVD menus once you get the hang of creating your own video DVDs.

How to create digital images

Image Composition
Follow the tenets of good composition for any image you are putting on a web page. If anything, this is even more important for web page images as visitors may be scrutinizing them in more detail as the images download.

As you are reading these sentences, a dramatic image is downloading in the space below. When an image fills a large portion of a web page segment -- as is the case here -- always give viewers something to read either above or below the image. If not, your viewers view only a blank screen during the download process, they may grow impatient and quit your site.

Photos continue to be one of the most compelling types of web content. If your pictures are beautiful, chances are your web site will be beautiful as well.

Notice how the image above follows good composition rules. It has been set up so the rainbow clearly stands out and draws your eye to it. The trees frame the image and provide perspective.

It has been said that a picture is worth a thousand words, however a poorly composed picture might be worth only two hundred. By following some simple guidelines you can create exciting images that inspire the mind.

Tried and True Photograph Composition Tips

Simplify
. move in close
. have a strong center of interest, colorful subject
. choose a simple background

Control the placement of subject within the frame
. have subject off center
. use lines to lead viewer to subject
. use foreground to frame subject and add depth
. try unusual camera angles

Add energy and depth
. use dramatic lighting, early and late in the day, sidelight and backlight - strong shadows
. diagonal lines and patterns can fill an image with energy
. use foreground to build depth and perspective
Images are great but they can bog down a page. Use lots of images, but spread them out over several pages. Use links to move from page to page, loading images as you need them rather than all at once.

A Few Web Composition Tips

Crop even tighter than usual to keep file size small
Keep pictures small
Use tables with borders to create an HTML "picture frame"
Horizontal photos load faster
Crop images to the shape that best displays the subject
Consider using a fine border around images to offset from the background
Capturing the best image quality
When you capture images with a digital camera or scanner, use the highest resolution setting possible. The resulting image files will contain the most "information", giving image-enhancing software the most data to work with and resulting in a final image of the best quality.

Before you begin enhancing images, set them up in an optimal fashion:

If you are opening an image from a Photo CD, choose the 512 x 768 size. This size helps you see effects of any enhancements you make and can be easily sized down to fit your web page. Generally speaking, try to work with an image larger than your end size.

With other image editing software, open digital images in RGB (the color standard used for television and computer screens), and set the pixels per inch to 72. (this matches the dots-per-inch rate on your computer screen and at a 1:1 ratio (matching the original size).

Using image enhancement software, optimize the image, following this basic order:

crop to preferred dimensions ,adjust brightness, contrast, color save a "beautiful" master
Note: Do this without compression in case you ever want to generate a different size version.
resample to smaller size (i.e., generally the smallest acceptable size)
sharpen as needed - often when re-sampling a large image to a smaller size, sharpening will help

Once editing is complete, save the image in JPEG format, choosing an option that gives you an acceptable compression to file size ratio. More information about this process is also found in Lesson four: Keep image file sizes small.

You can enhance web page images using a variety of software tools. While some require a fair amount of time and experimentation to learn, others can be mastered rapidly. One such product, KODAK Picture Easy Software , ships with some Kodak digital point-and-shoot cameras and personal scanners. It lets you fine tune images with a variety of tools, and helps make the task easier.

Seeing the many possibilities is really an easy way to "feel" your way to a good image. Enhance By Example helps do that by offering many options.

Variation in the Touch Up menu helps do that by offering many options. Below are two images taken by a casual photographer. On the left is the original image. The photographer wanted to enhance the rosy pink tones of the flowers. On the right is the image after changes made with PhotoDeluxe's "variations" method. With this method, seven different examples of the image are shown - here we chose one that brought out the pink tones.

Digital imaging tools and resources :

An effective way to obtain digital images is to capture them yourself using a digital camera. Or, if you are using a traditional camera and film you can scan images using a desktop scanner, or bring them to a service provider to have them transferred to KODAK Picture Disks (US Only Dealer Locator), or KODAK PHOTO CD discs, or transferred to PhotoNet Online. Commercial CDs, in a variety of price ranges, are also on the market. These contain many images, most center around a certain theme. Shopping around to find CDs that feature themes relevant to your web page will give you a library of images to select from. You might use them "as is" or combine them with your own images to make them more relevant.
Do you own a digital camera but don't know how to get started with digital photography? Are you a seasoned amateur who just wants to learn a little extra to help your images pop? Read these articles to develop better photography skills:

How to:
How to Start Learning Digital Photography
While very easy to operate, even the simplest digital camera is capable of far more than most people use it for. Some features of a camera defy common knowledge and relying on what is intuitive will sometimes stand in your way of taking a good picture.

Guidance to Take Digital Photos - Take Good Pictures Instantly
As a beginner, you need a guidance to take digital photos. Taking many pictures is a good way to learn, but it's much more effective if you learn some basic aspects up-front. There are some basic rules in photography that you simply need to know about.

Take Better Pictures
Learn how to create beautiful and interesting photos-and avoid common photo mistakes.

Understanding Resolution
The key to editing, scanning, and printing images lies in understanding how pixels transform into inches and vice versa.

Creating Digital Images
Follow the tenets of good composition for any image you are putting on a web page. If anything, this is even more important for web page images as visitors may be scrutinizing them in more detail as the images download.

About Compression
When you shoot a digital image, it must be saved in a digital file format, and your choice (or lack thereof) of that file format helps to determine the amount of compression that is applied to the image. What compression does, as its name implies, is to compress the data inside of the image so that its file size is smaller and thus takes up less disk space. Compression, when used correctly, is an extremely beneficial tool.

How Shutter Speed Work
Traditionally, the shutter speed is the amount of time that light is allowed to pass through the aperture. Think of a mechanical shutter as a window shade. It is placed across the back of the aperture to block out the light. Then, for a fixed amount of time, it opens and closes.

Controlling Light
It is important to control the amount of light that reaches the sensor. Thinking back to the water bucket analogy, if too much light hits the sensor, the bucket will fill up and won't be able to hold any more.